Managing Storage Nodes
CTERA Portal can write your data to storage nodes from many different vendors. The Storage Nodes page in the Global Administration view enables you to easily add new storage nodes, dedicate storage nodes to virtual portals, stop and start writing to different storage nodes, and migrate data seamlessly from a storage node to other storage nodes.
The tasks in this section can be performed in the Global Administration View only.
In this section
Viewing Storage Nodes
This task can be performed in the Global Administration View only.
To view all storage nodes in the system:
• In the navigation pane, click Main > Storage Nodes.
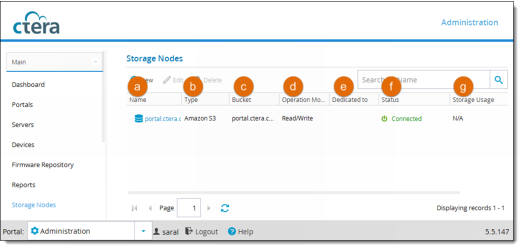
The Main > Storage Nodes page opens, displaying all storage nodes.
a Name. The storage node's name.
b Type. The storage node's type.
c Bucket. The name of the storage node's bucket.
d Operation Mode. The storage node's operation mode. This can be any of the following:
• Read/Write
• Read Only
e Dedicated to. The name of a single virtual portal to which the storage node is dedicated, if applicable.
f Status. The storage node's current status. This can be either of the following:
• Connected
• Not Connected
Note: The system will not attempt to store new blocks in storage nodes that are not connected.
g Storage Usage.The amount of storage used, followed by the amount of free space. This field is relevant for CTERA storage nodes only.
Note: Note: The system will not attempt to store new blocks in storage nodes that are out of disk space.
To view details of a specific node:
• Click the node name on the Storage Nodes page.