![]()
![]()
|
|
|
Network and power connections are made via the appliance's rear panel.
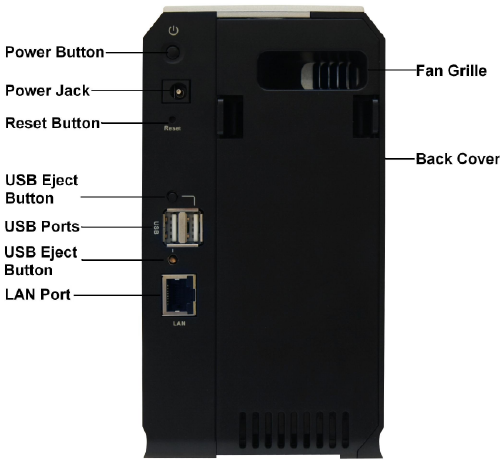
The appliance rear panel contains the following elements:
Element |
Description |
Power button |
A button used for turning the appliance on and off. |
Power jack |
A power jack used for supplying power to the appliance. Connect the power supply cable provided in the appliance package to this jack. |
Reset |
A button used for restarting the appliance or resetting it to its default settings. For information, see Restarting the CTERA Appliance and Resetting the CTERA Appliance to Its Default Settings. |
USB |
Two USB 2.0 ports used for connecting USB drives. Note that you can connect more than two USB drives, by connecting a powered USB hub. Be sure to use a powered hub, in order to avoid exceeding the power capacity of the USB ports. |
LAN |
An Ethernet port used for connecting the appliance to your Ethernet LAN switch or router. Connect the Ethernet cable provided in the appliance package to this port. For best performance, use a Gigabit-capable Ethernet switch. |
Back cover |
The back cover opens to allow insertion of up to two SATA 3.5" hard drives. |
Fan grille |
Do not cover or obstruct the fan grille as it is needed for proper cooling of your appliance. |
USB Eject 1 / USB Eject 2 |
Buttons used to eject the USB drives. Each button ejects the USB drive connected to the port that is adjacent to the button. After ejecting a USB drive, wait until the USB LED turns off. You can then safely remove the USB drive from the system. |
See Also |