Preparing a Backup Seeding Hard Drive
When you have a lot of information to back up, the initial backup to the cloud can take a long time. If your CTERA service provider offers a backup seeding service, then you can speed up the initial backup by preparing a drive that contains all of the files you want to include in your initial backup. You then deliver this seeding drive to the service provider, and the service provider uses the drive to create the initial backup.
The seeding drive can optionally be encrypted using AES-256 and RSA public key encryption, so there is very little risk to your sensitive information.
To prepare a backup seeding hard drive:
1 Select the files and folders you want to include in the initial backup. These files and folders will be written to the seeding drive.
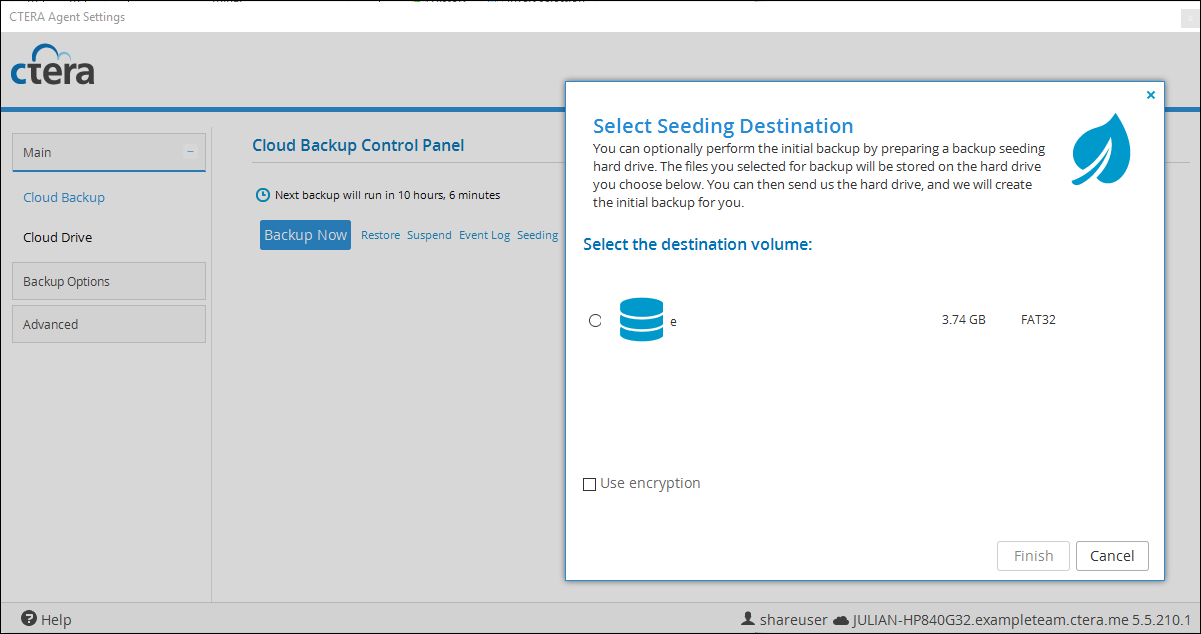
2 In the navigation pane, click Main > Cloud Backup.
The Cloud Backup Control Panel page is displayed.
3 Click Seeding.
Note: This option is displayed only if the backup seeding service is supported by your service provider.
The Select seeding destination dialog box appears.
4 Choose the drive to use as the seeding drive.
Warning: The original content of this drive will be deleted.
5 Optionally, to encrypt the seeding drive, select the Use encryption check box.
6 Click Finish.
7 Click Yes in the confirmation message that is displayed.
The selected files and folders are written to the seeding drive.
You can now deliver the seeding drive to your service provider.
Note: During the time your service provider is loading the backup seeding drive to your account, the backup service will be temporarily disabled for your CTERA agent.
Changing the Backup Files Selection
Selecting Backup Files from Windows Explorer
1 Browse to the desired files and/or folders.
2 Right click each file or folder and select:
• CTERA Agent > Add to backup to select the file for backup,
Or,
• CTERA Agent > Remove from backup to deselect the file from the backup selection.
Note: An overlaid

icon on a folder indicates that files in this folder are selected for backup and new files and folders in this folder will be backed up.
Selecting Backup Files in the CTERA Agent Web interface
1 Right-click the CTERA Agent icon and select Settings.
The CTERA Agent Settings window is displayed.
2 Select Backup Options > Backup Files.
3 Change the selection of files to back up.
a Expand the tree (All Volumes) and navigate to any drives, folders or files you want to add or remove from the backup.
b Select the check box next to any item you want to add to your backup.
c Deselect the check box next to any item you want to remove from your backup.
d Folders are displayed in the tree.
e Files in each folder are displayed in the right pane when you select the folder.
f The Selected Files field indicates the size of the files selected for backup.
g The Cloud Storage Usage field indicates the amount of used space in your account after the next cloud backup operation, including backups from any other CTERA devices included in your account.
4 Click Save.
Note: A folder icon with a plus sign together with a selected check box (

) indicates that the folder and all of its sub-folders are selected for backup.
A folder icon without a plus sign together with a selected check box (

) indicates that some (but not all) of the folder’s contents are selected for backup.
An empty check box (

) indicates that neither the folder nor any of its contents are selected for backup.
Backup and Exclude Sets
A Backup Set is a filter which includes files in a backup based on criteria of your choice. An Exclude Set is a filter which excludes files from a backup based on criteria of your choice. Each Backup Set or Exclude Set represents a group of files that will be included or excluded in a cloud backup, provided the Backup Set or Exclude Set is enabled. When you create a Backup Set or Exclude Set, you can specify files by extension type, name, location, size, and/or modification date. For example, you could create a Backup Set called "My Music" and include all files with the extensions *.wav and *.mp3 that are located in the folder My Documents > Music.
If a file is included in a Backup Set and the Backup Set is enabled, it will be included in the backup even if it is not individually selected as a Backup File.
If a file is included in an enabled Backup Set but is also included in an Exclude Set, the file will be excluded from the backup.
Backup Sets and Exclude Sets can be enabled or disabled. When you create a new Backup Set or Exclude Set, it is enabled by default.